FAQs
Getting Started
What software does ePortfolios use?
ePortfolio runs on WordPress. WordPress is a state-of-the-art, open source, semantic personal publishing platform with a focus on aesthetics, web standards, and usability. Often associated with a blog, WordPress is much more than a blog- it is a simple and easy-to-use web publishing platform that can allow you to build a web presence with little or no fuss!
ePortfolios are running a WordPress Multi-user installation which allows students to quickly customize their own web publishing space.
How much space does each user get?
The limit is 50,000MB per site and maximum file size for upload is 100,000 KB. We can increase this upon request to askit@capilanou.ca.
How do I password protect a specific website page or post?
Besides setting the visibility of your entire ePortfolio, you also have the option of customizing privacy for individual pages. They are set to “Public” by default, which corresponds to the level to which you have set your entire site. However, if you are creating a page that you would like to be even more private than the rest of your ePortfolio, you can do so by choosing either ‘Private’ or ‘Password Protected’. ‘Private’ hides the page completely from the user, while ‘Password Protected’ prompts the user to enter a password when attempting to access the page. As you can see in the image below, if you choose to make the page password-protected, you are immediately prompted to enter a password for the page.
Please see Privacy and Security FAQs below.
How long will the my ePortfolio website exist? Meaning, once a student graduates, will they still have access to the blogs they created?
In the event that service limits are established, all users will be notified of the changes in service provision in advance of their inauguration.
Privacy and Security
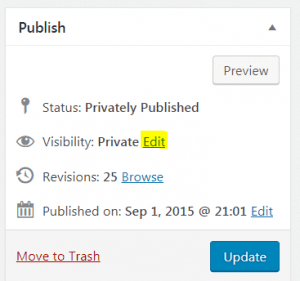
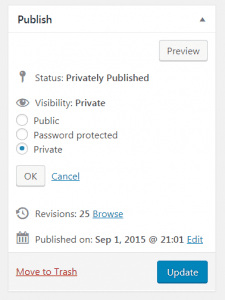
How do I change privacy settings for an individual website page or post?
Besides setting the visibility of your entire ePortfolio, you also have the option of customizing privacy for individual pages. They are set to “Public” by default, which corresponds to the level to which you have set your entire site. However, if you are creating a page that you would like to be even more private than the rest of your ePortfolio, you can do so by choosing either ‘Private’ or ‘Password Protected’. ‘Private’ hides the page completely from the user, while ‘Password Protected’ prompts the user to enter a password when attempting to access the page. As you can see in the image below, if you choose to make the page password-protected, you are immediately prompted to enter a password for the page.
Settings by Page or by Post
This option is found in the left column of every page and post.
- On the edit post page, look for “visibility” in the Publish box on the right-hand side.
- Click “Edit”, select “Private”
- Click “Update”.
- Then click “Update” for the entire page or post.
How do I change my privacy settings for my entire ePortfolio website?
Deciding on your ePortfolio’s Privacy Settings
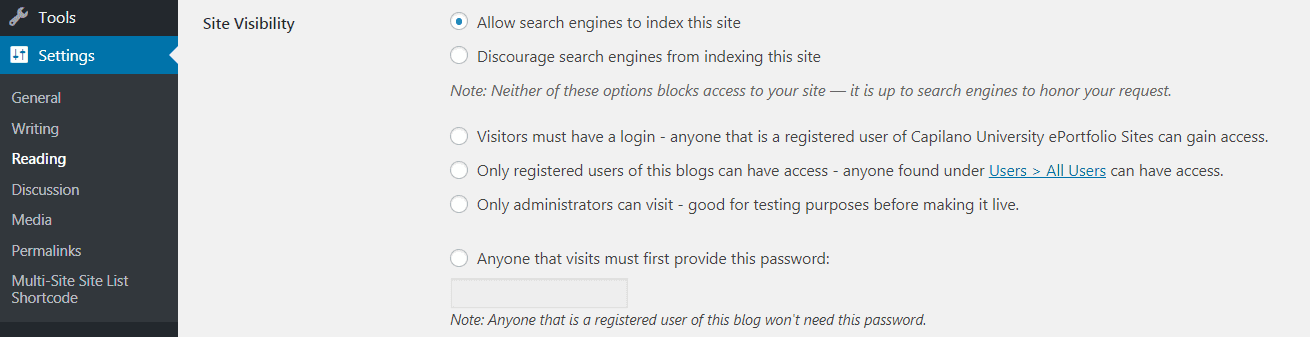
On WordPress Blogs, in the Reading section under Settings, there are six different options listed for site visibility. They are:
- “Allow search engines to index this site” = “Make my ePortfolio searchable and visible to everyone via search engines such as Google and Bing”
- “Discourage search engines from indexing this site” = “Make my ePortfolio unsearchable, but still accessible to anyone”
- “Visitors must have a login – anyone that is a registered user of Capilano University ePortfolio Sites can gain access.” = “Give all CapU ePortfolios users access to my ePortfolio”
- “Only registered users of this blog can have access – anyone found under Users>All Users can have access.” = “Give access to anyone who I have added as a subscriber to my blog”
- “Only administrators can visit – good for testing purposes before making it live.” = “Give access to anyone who I have added as an administrator to my blog”
- “Anyone that visits must first provide this password.” = “Give access only to registered users of the blog, or those who have the password you set.”
Understanding the Different Levels of Visibility
Levels 1 and 2, if chosen, make your site public. Anyone on the internet can view your ePortfolio, but choosing between the two dictates how users gain access: the first will allow a user to find your ePortfolio by using a search engine; the second will make your site unsearchable, but if a user knows the website address, they will have open access to it.
Levels 3, 4 and 5 make your site private, to varying degrees. Given that your ePortfolio is created through the CapU ePortfolios platform, this means that CapU ePortfolios is the ‘network’ for your site; thus, choosing level 3 allows anyone registered with CapU ePortfolios to access your ePortfolio. To make accessibility more selective, you can choose either level 4 or 5, which will grant only certain CapU accounts access to your site (for the former, subscribers, and the latter, administrators). To set up these lists, you must go to Users > Add New, enter the email addresses of the users who need access (these addresses need to be connected to their CapU accounts), select their “Role” (either Subscriber or Administrator), and then send the invitations.
*Note: making a user an administrator will give the user the ability to edit your ePortfolio in the same capacity as you. So, only use level 5 if the people who need access are the same who need to have full editing privileges to your site.
Before your ePortfolio is ready to be published, you can keep it private by choosing level 5.
To make an individual blog or site private:
- Go to the specific blog’s dashboard (to get there, access to eportfolios.capilanou.ca/username/)
- Click on My Sites> find your blog
- Click on “Visit Dashboard”.
- Click on the Reading link under the Settings tab on the left-hand side of the dashboard.
- From here, click on one of the five options for controlling external access to your space, located under Site Visibility.
Profiles
What is the difference between a Username and Display Name?
Usernames are unique identifiers in your profile, and in URLs. Display Names are customizable account names (usually your first and last name) that show up in all activity on the ePortfolio websites. For example, your Display Name is published when you leave a comment on a blog, if you author a blog post, or if you send a private message. Display names are not unique (for example, two people named John Smith may use “John Smith” as their Display Name).
How do I load a picture of myself (an ||avatar||) for appearing in my profile and other areas?
Most WordPress themes use the Gravatar service to generate user avatars in areas such as the comments section.
To set up your Gravatar account simply:
- Go to http://en.gravatar.com/
- Sign up by clicking on the sign up link and providing the email that is tied to your WordPress account
- NOTE: Make sure that you provide the correct email
- Upload (or paste the URL of) the image you wish to use
That’s it! You should now be able to view your “Gravatar” on all your WordPress blogs.
How do I change my Display Name?
- Using the dark gray bar at the top of the screen, select: My Account > Profile > Edit Profile and Privacy Settings
- To change your display name, re-write your preferred name in the ‘Name (required)’ field
- Select Save Changes
How do I change my email?
You cannot change your email. Your login credentials are dependent on your Capilano University credentials and must be synchronized with our system. When you change your password in the university system it will automatically update for your website.
Your ePortfolio
How do I log into (or get to the dashboard) of my website?
From your ePortfolio homepage (eportfolios.capilanou.ca/yourname/), once you’ve logged-in, go to the dark gray navigation bar at the top of the screen. Select “My Sites > your ePortfolio> Dashboard”.
Your individual website should be located at the address specified from your instructor using the ePortfolio . Your website address is determined by your user name. For example, your websiste address will be:
https://eportfolios.capilanou.ca/yourname/
How do I change my website title?
To change the title of your website go to the Settings tab in the administrative back-end and you will see a field for website title as well as a field for the site tagline, which is a space for a brief description of your site. Just type in a new title or tagline and save the changes.
Why can't I upload a new theme or plugin?
ePortfolios is a Multi User install of WordPress the same as WordPress.com all themes and plugins are shared across the ePortfolios network therefore we must evaluate each theme before it is added to the system. We are open to adding new themes on request some things we look for are:
- Is it compatible with the recent version of WordPress?
- Would it be useful to other users on the system?
- How are the ratings based on comments are others having problems with it?
- Does it support the WordPress menu system, threaded comments that most users expect in a theme?
If you have found a theme that meets the above criteria let us know about it by sending a request to askit@capilanou.ca and we will take a look.
How do I make my website look different?
You can change the look and feel of your website going to Appearance->Themes.
What WordPress themes are available for ePortfolios?
Elegant Themes are:
We have an account and full support with – https://www.elegantthemes.com/.
Divi
This is the smartest, most flexible theme in our collection.
With Divi, the sky’s the limit. This theme may be more suitable for advanced users.
Explorable
Explorable is a location-based theme that pins your posts on a map. Listings become part of a journey, and exploring your website has never been so fun. With the ability to create location-based listings, the theme becomes a great tool for building travel blogs, local business directories, travel guides and more. Combined with user star ratings, a full-fledged blog and a fully responsive design; the possibilities are endless!
Fable
Fable is beautiful theme built for blogging. The theme tells a story by building a visual narrative through post variation. Fable is built for easy reading. Its spacious, full-width, and long-format style makes scrolling a pleasurable journey. Each post type is displayed boldly, giving your content the full-screen attention that it deserves without bombarding the senses. The design is neither busy nor overbearing; reading this story is like breathing a breath of fresh air.
Feather
Feather has a light and airy quality that gives your website a fun and care-free vibe. The theme is simple, but its subtle details and textures have been designed with care. If you are looking for a subdued design that is still stylistic and impressive, then Feather just might be the theme for you.
Flexible
Flexible is a sleek and minimal portfolio theme packed full of some awesome features. The theme puts your work first, keeping the design elements to a minimum while still maintaining a definitive modern style. With its filterable, ajax-powered multi-media gallery, Flexible is perhaps our most feature-rich gallery theme yet.
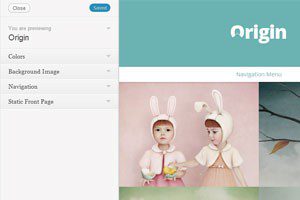
Origin
Origin is a stunning grid-based theme that tells a story through imagery. The theme creates a truly engaging experience by saturating the screen with your beautiful photos. The theme is also responsive, meaning it will look and work great on mobile devices as well. If you are an artist looking to showcase your latest work, or if you are a blogger looking to give your visitors a fun new way to browse your latest posts, then Origin is a great choice for you!
WordPress Themes are:
Baskerville
Baskerville is a beautiful, responsive and retina-ready masonry theme for hoarders. It’s the perfect way to showcase your posts, videos, images and galleries, and share your favorite quotes and links. Features responsive design, retina-ready assets, full-width header image, support for all post formats, custom logo upload, custom widgets (video, Flickr and Dribbble), four-page templates (including a contributors template), editor styling, like functionality via the ZillaLikes plugin and translation-ready code.
Blask
Blask is a modern portfolio theme that displays your work in a clean, minimal layout. The simple-yet-bold grid design keeps the spotlight on your projects, and scales to fit any screen size.
Blask comes with a beautiful blog page, perfect for sharing your thoughts and sparking a conversation with your visitors. Whether you’re an illustrator, designer, or photographer, Blask is the perfect canvas to showcase your creativity.
Boardwalk
Meet Boardwalk, a flexible, versatile, and responsive theme designed to show off your content in an unconventional — yet elegant and creative — way.
Cubic
A minimalistic square theme.
Davis
Davis is a practical and clean Responsive WordPress theme created for General/Blog sites. Very easy to use with built-in theme options page. Choose from a couple different page templates. Theme fully supports mobile devices – you can be sure that your site looks and works great on mobile phones and tablets.
Iwata
Iwata is a clean, colourful and lightweight theme for bloggers. It features responsive design, great typography, the aside, quote and image post formats, editor styles, JetPack infinite scroll, custom accent colour, custom background colour and custom header image. Included translations: Swedish/svenska.
Libre
A stylish, classic look for your personal blog or long-form writing site. The main navigation bar stays fixed to the top while your visitors read, keeping your most important content at hand, while three footer widget areas give your secondary content a comfortable home.
Minnow
Minnow is designed to put your social presence front and center by displaying your social links menu prominently below the site title and logo, so readers can easily find you on your favorite social networks.
Sketch
Sketch is a responsive portfolio theme, perfect for showcasing your creative talent, whether it be illustration, design, or photography. The theme’s clean, light design puts the focus on your projects.
Spun
Spun is a minimalist, responsive theme that puts the emphasis on your content; extraneous navigation fades away to put your words and images front and center.
The Columnist
The Columnist blends big, bold Typography with a minimalist principal to produce a truly attractive design.
Twenty Thirteen
The 2013 theme for WordPress takes us back to the blog, featuring a full range of post formats, each displayed beautifully in their own unique way. Design details abound, starting with a vibrant colour scheme and matching header images, beautiful typography and icons, and a flexible layout that looks great on any device, big or small.
Twenty Fifteen
Our 2015 default theme is clean, blog-focused, and designed for clarity. Twenty Fifteen’s simple, straightforward typography is readable on a wide variety of screen sizes, and suitable for multiple languages. We designed it using a mobile-first approach, meaning your content takes center-stage, regardless of whether your visitors arrive by smartphone, tablet, laptop, or desktop computer.
Twenty Sixteen
Twenty Sixteen is a modernized take on an ever-popular WordPress layout — the horizontal masthead with an optional right sidebar that works perfectly for blogs and websites. It has custom colour options with beautiful default colour schemes, a harmonious fluid grid using a mobile-first approach, and impeccable polish in every detail. Twenty Sixteen will make your WordPress look beautiful everywhere.
Twenty Seventeen
Twenty Seventeen brings your site to life with header video and immersive featured images. With a focus on business sites, it features multiple sections on the front page as well as widgets, navigation and social menus, a logo, and more. Personalize its asymmetrical grid with a custom colour scheme and showcase your multimedia content with post formats. Our default theme for 2017 works great in many languages, for any abilities, and on any device.
Twenty Nineteen
Our 2019 default theme is designed to show off the power of the block editor. It features custom styles for all the default blocks, and is built so that what you see in the editor looks like what you’ll see on your website. Twenty Nineteen is designed to be adaptable to a wide range of websites, whether you’re running a photo blog, launching a new business, or supporting a non-profit. Featuring ample whitespace and modern sans-serif headlines paired with classic serif body text, it’s built to be beautiful on all screen sizes.
Twenty Twenty
Our default theme for 2020 is designed to take full advantage of the flexibility of the block editor. Organizations and businesses have the ability to create dynamic landing pages with endless layouts using the group and column blocks. The centered content column and fine-tuned typography also makes it perfect for traditional blogs. Complete editor styles give you a good idea of what your content will look like, even before you publish. You can give your site a personal touch by changing the background colours and the accent colour in the Customizer. The colours of all elements on your site are automatically calculated based on the colours you pick, ensuring a high, accessible colour contrast for your visitors.
How do I configure my theme?
Follow the instructions below to configure your theme
How to Activate Your Theme
Activate it from within the Appearances > Themes tab.
Adding Thumbnails (aka “featured images”) to Your Posts
For each post, you can define an image that will be displayed along with your content on Posts and Category pages. Thumbnail images (aka Featured Images) are added using the “Featured Image” option within your WordPress Dashboard. Whenever you create or edit a post, look for the “Featured Image” box. This box will be located to the right of your text editor or below your text editor depending on the size of your screen. Click the “Set featured image” link and upload the image that you would like to use. Once uploaded, scroll down and select “Full Size” as your image size, and then click the “Use as featured image” link. This image will now be used as your Thumbnail image for the post.
Defining a Custom Logo Image
You can define your own logo image from within the ePanel theme options page in your WordPress Dashboard. Within ePanel, under the General Settings > General tab, locate the “Logo” field. In the field, input the full URL to your logo image. You can use the “Upload Image” button below the field to upload your logo image if haven’t already done so. After uploading, copy and paste the URL to the file into the field and click “Save” to save your ePanel settings.
Configuring the Header/Call to Action
The header/call to action to comprised of 4 elements.
Logo Image – Your logo image is defined as outlined above. Once defined, your logo appears first in your header.
Website Description – Your description, displayed below the logo in a red bar, can be adjusted via the “Settings > General” tab in your WordPress Dashboard.
Call To Action Button – Your call to action button can be adjusted within ePanel. Click “Appearances > Theme Options” and locate the “Call to Action Button Url” and “Call to Action Button Text” options listed under the General Settings tab.
Header Background Image – Your header background image can be adjusted via ePanel. Click “Appearances > Theme Options” and locate the “Header Section Custom Background” setting. Click the “Upload Image” button to upload and define a new header image.
Adding Projects
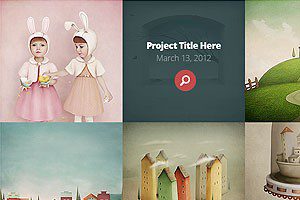 Projects give you a way to showcase your recent work. When a new project is added, it is displayed on the homepage within a grid-based gallery. To add a new project, you can use the “Project” custom post type. After you activate a theme, you will notice a new “Projects” tab has been added. Click Projects > Add New to create a new project. You can add an image to your project using the “Featured Image” link (more info on adding Featured Image above in the “Adding thumbnails (aka “featured images”) to your posts” section).
You can also add galleries to your projects using the standard WordPress Gallery function. To add a gallery to your project, click the “Add Media” icon above the text editor. Next click the “Create a Gallery” link and select the image you would like to add. Once selected, click the “Create A New Gallery” link, followed by the “Insert Gallery” link.
Configuring the Homepage Slider
The featured slider can be set up using two different methods. You can either populate the tabs using Pages, or you can populate it using posts from a designated category. In the Appearances > Theme Options page in wp-admin, under the General Settings > Featured Slider tab, you will see an option that says “Use Pages.” If you select this option then pages will be used, if you don’t then posts will be used. If you want to use Pages then you simply select “Use Pages,” and then below the option select which pages you would like to display in the slider. If you don’t use pages, then simply select the “Featured Category” from the dropdown menu and posts from that category will be added to the slider.
Featured Image
You should also define an image to be used for each page. To add an image to your slider, edit any Post/Page in your slider and add a featured image using the “Featured Image” link to the right of your text editor, or by using the Thumbnail Custom Field as outlined in the “How do I add the thumbnails to my posts? ” section above.
Adding Testimonials
 To add a new testimonial, you can use the “Testimonials” custom post type. After you activate your template, you will notice a new “Testimonials” tab has been added. Click Testimonials > Add New to create a new testimonial. The body content of your post will be used as the testimonial quote. You can add a photo to your testimonial using the “Featured Image” link (more info on adding Featured Image above in the “Adding thumbnails (aka “featured images”) to your posts” section).
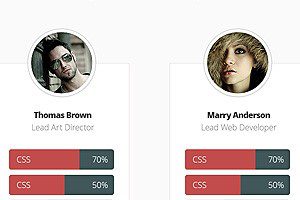
Adding Team Members
You can add members to your team using the “Team Members” custom post type. When you create add a new team member, that person’s bio will be added to your homepage and within the Team Page Template. To add a new team member, click “Team Members > Add New.” The content of your post will appear on the Team page as the member’s bio.
Adding A Photo – Each team member needs a photo. To define a photo for your team member, simply define a “Featured Image” for the post (more info on adding Featured Image above in the “Adding thumbnails (aka “featured images”) to your posts” section).
Adding Skills – Each member bio can include a list of skills. When you create a new Team Member custom post type, you will notice some additional settings below the text editor called “ET Settings.” To add a new skill, click the “Add Skill” button and then fill in the name of the skill and a percentage of expertise. You can also define a “position” for each member, such as “Web Developer” (or whatever position the member fills within your company).
Creating A Team Page – Once you have added some team members, you next need to create a Team page. To do this, simply create a new page and select the “Team” page template from within the “Template” dropdown menu to the right of your text editor within the “Page Attributes” panel. Once published, this page will display a bio of all your team members.
Adjusting Page Descriptions
Below your Page title on each page can be added a unique page description. This description is placed within a colored box just like your website’s description on your homepage. To add a description to a page, you must create a new custom field with the name “Description” (make sure to use a capital D). In the Value field, input the text that you would like to use for your description.
Customizing Your Theme’s Colors Using the Theme Customizer
 Some templates use the WordPress Theme Customizer interface to allow you to adjust your theme’s colors quickly and easily. To use the Theme Customizer, click the Appearances > Themes > Customize link. This will launch the customizer along with various color options.
Using Shortcodes – Create Advanced Layouts with Ease
All of our themes come with a comprehensive collection of shortcodes. These shortcodes allow you to use pre-made design elements to create advanced page/post layouts without any HTML knowledge. When you install the theme, you will notice that some new buttons have been added to the WordPress text editor. Clicking these buttons will reveal options for adding shortcodes to your post.
Using Page Templates to Create Advanced Layouts
All of our themes come with a collection of page templates that can be used for a variety of purposes. You can apply each of these page templates to any page that you have created. When you edit a page in wp-admin, you will notice a Templates dropdown menu to the right of the text editor. Here you can select from a list of available page templates. Once a template is selected, additional settings will appear in the “ET Page Templates Settings” box below the dropdown menu.
How do I add a user to my website?
To add additional users to your website go to your left side panel under Users->Add New.
Add Existing User
Enter the email address or username of an existing user on this network to invite them to this site. You can select the role type and choose whether to send that person an email asking them to confirm the invite.
Add New User
Create a brand new user and add them to this site. Enter the Username and email of the new user. You can select the role type and choose whether to send that person an email asking them to confirm the invite.
What's the difference between writing a post and writing a page?
This is an important terminological/conceptual distinction to grasp, as posts and pages serve radically different functions. A post is an article that shows up in the chronology of your blog. In other words, posts appear in your website, most recent at the top of the page.
A page is what most folks may be more familiar with. This is a static space that is not part of the chronological logic of the website. A page sits outside of this inverted timeline, and often features more static content like information about the site, the author, a syllabus, readings, etc.
Plugins for Administrators
Note: In this case, the Administrator is the site owner, for example, Brian Ganter is the Administrator of eportfolios.capilanou.ca/bganter. You are the Administrator of your own site.
Contact Form 7
Contact Form 7 can manage multiple contact forms, plus you can customize the form and the mail contents flexibly with simple markup. The form supports Ajax-powered submitting, CAPTCHA, Akismet spam filtering and so on.
Embed Any Document
Embed Any Document WordPress plugin lets you upload and embed your documents easily in your WordPress website without any additional browser plugins like Flash or Acrobat reader. The plugin lets you choose between Google Docs Viewer and Microsoft Office Online to display your documents.
Google Analytics Dashboard for WP
This Google Analytics for WordPress plugin enables you to track your site using the latest Google Analytics tracking code and allows you to view key Google Analytics reports in your WordPress install.
Hypothesis
Hypothesis is an open platform for the collaborative evaluation of knowledge. This plugin embeds the necessary scripts in your WordPress site to enable any user to use Hypothesis without installing any extensions.
Invisible reCaptcha
Invisible reCaptcha for WordPress is an extremely powerful plugin that integrates the new Invisible reCaptcha by Google with your WordPress site.
Sketchfab Viewer
Simply drop a model URL in your WordPress post and it will become an embedded model.
The Event Calendar
The Events Calendar is a carefully crafted, extensible plugin that lets you easily share your events. Beautiful. Solid. Awesome.
Can I add more options to my text editor?
Yes, you can customize the text editor by going to WP Edit in the Dashboard menu. You can drag and drop the buttons you want to use. Formats and Paragraph menu will allow you to use Heading for a better Search Engine Optimization (SEO) result. It will also be consistent with your theme’s look and feel. For “Best Practice” do not use U because every underline on a website represents a link. We don’t want to trick our users into clicking on a false link.
Please see WP Edit Buttons Guide for all you need to know about setting up your text editor.
What does wpautop do to the line spacing of my text?
One of these filters is wpautop, which replaces double line breaks with <p> tags, and single line breaks with <br /> tags. However, this filter sometimes causes issues when you are inputting a lot of HTML markup in the post editor.
This plugin displays a checkbox in the publish meta box of the post edit screen that disables the wpautop filter for that post.
What are comments and how do I manage them?
Often times, initial comments are placed in a moderation queue until you approve them. Once you approve a comment from a user, he or she should be able to comment freely thereafter. You can view the comments on your website as well as those awaiting moderation in the Comments tab in the back-end of your website. If you want to change the permissions for your comments- say allow anyone to comment without moderating- see the Settings tab and look for the Discussion subtab. This is where you can control the comment settings.
Additionally, when writing a post, you can turn off the comments on a post-by-post basis by first ensuring that the Discussion section is enabled from the Screen Options menu in the top-right of the screen. Once the Discussion section is enabled, you will be able to disable comments by un-checking the Allow comments checkbox.
Keep in mind that comments are extremely vulnerable to spammers. IT Services at Capilano has activated two plugins prevent spam one being reCaptcha and the other being Akismet. reCaptcha will force users to enter a randomly generated captcha code to post a comment. Akismet will filter spam that may get through this method. This will be placed under Comments->Akismet Spam for you approval or disapproval.
Can I change the chronological order of my comments?
Yes, go to the left panel -> Settings -> Discussion -> Other comment settings ->
Comments should be displayed with the (select option: older or newer) comments at the top of each page.
How do I make my front page a static page rather than a blog?
To make your front page a static page rather than a blog you need to create a static page that you would like as your front page. Then go into the Options tab and then click on the Reading subtab. Once you do this you will see the following: Instead of having the front page display your latest posts, select the radio button that says “static page” and select the page you created for the front page. Additionally, you can create another page where you would like your blog posts to appear. This is extremely useful when you would like to create a resource more akin to a traditional page rather than a blog, while maintaining the functionality of both.
How do I upload a document and place it in a post or page?
You can easily upload documents, such as a course calendar or syllabus, into a post or page. Doing this is relatively straightforward. Go to Write → Post (or Page) and look for the “Add media” button that looks like a gray asterisk.
When you click on that button, a dialog box will appear offering you the option to upload a file from your hard drive, or to link directly to a file that is already online. Once you have located your file (whether on your hard drive or online) click on the “Upload” button or “Insert into Post” button, respectively.
If uploading a file from your hard drive, you will get a dialog box asking you to title the document, as well as to provide a caption and description (both of which are optional). Once you are done, click on the “Insert into Post” button and you are done.
How do I upload an image and place it in a post or page?
As with documents, you can easily upload and insert an image from your hard drive into a post or page. Go to Write → Post (or Page) and look for the “Add Image” button that looks like a picture canvas immediately following the “Add Media” title as pictured below.
When you click on that button, a dialog box will appear offering you the option to upload an image from your hard drive, or to link directly to a image that is already online. Once you have located your file (whether on your hard drive or online) click on the “Upload” button or the “Insert into Post” button, respectively.
If uploading an image from your hard drive, you will get a dialog box asking you to title the image, as well as to provide a caption and description (both of which are optional). Once you are done, click on the “Insert into Post” button and you are done.
I can't upload any more files. What's going on?
You are probably out of space. Contact us and we can add more (within reason). If you are uploading video or sound files please use a YouTube, Vimeo, SoundCloud or similar external accounts. See instructions on how to do this below.
Why should I consider using external services to store my images and documents?
We currently have limited amount of upload space per user. This will not be enough if you are uploading large pdf files, videos, or images. It may be preferable to use an outside service that you can integrate with ePortfolios such as Flickr for your photos, YouTube for your videos, SoundCloud for your sound, or DivShare for your files. This is probably the best practice, because if you ever want to move your blog to another service you will have persistent links to documents and images that you will not have to update to the new blog URL.
How do I embed videos?
WordPress supports oEmbed just paste the URL to the video and and WordPress will display the player. WordPress also supports oEmbed for the following sites:
- YouTube – (How to Use YouTube)
- VimeoDaily – (Vimeo Basics)
- Motion
- blip.tv
- Flickr (both videos and images) – (How to Get the Most Out of Flickr)
- Viddler
- Hulu
- Qik
- Revision3
- Scribd
- Photobucket
- PollDaddy
- Google Video
- WordPress.tv (only VideoPress-type videos for the time being)
- SmugMug (WordPress 3.0+)
- FunnyOrDie.com (WordPress 3.0+)
How do I embed sound?
How do I embed a Google map?
- Go to Google Maps
- Search for the location that you’d like to display and decide on your zoom level and other preferences
- Click on the “Link” button – presented as a chain icon – in the top right corner
- If you wish to customize the map you can click on the “Customize and preview embedded map” link and select your size and default view
- Copy the HTML embed code (should start with “<iframe”)
- Go to the edit screen for the post that you wish the map to appear in
- Make sure that the “HTML” tab is selected for the content field
- This tab is located at the top right of the post content field next to the “Visual” tab
- Paste the HTML embed code in the post content field in the area you wish the map to appear (before or after text etc.)
- Click on the “Publish” button
You should now have the desired Google map embedded on your site.
What are widgets?
How do I export and or import my existing ePortfolios site?
You can import a website from numerous other blogging platforms such as WordPress, MoveableType, Blogger, LiveJournal, TypePad, Grey Matter, TextPattern, DotClear, and RSS.
Please note: Both sites must be currently active during this process.
Website settings are not transferred. You will need to reset some configurations such as selecting a theme and theme options.
More information from WordPress:
https://wordpress.org/support/article/importing-content/
Importing posts only: https://youtu.be/em-VmP1KbRo
Before importing make sure the site you are going to has sufficient permissions and the appropriate available memory to host your site. You can either edit the php.ini file if you have access or ask email askit@capilanou.ca to make this change if necessary.
Download a pdf for Exporting and Importing a WordPress Site
To import your site from an application other than WordPress, please read your respective blogging platforms details for exporting your data. To export data from a WordPress.com site, please follow these steps:
- Log in to your WordPress.com site
- Go to Dashboard → Tools → Export
- Select the content you wish to export using the radio buttons
- Click on the “Download Export File” button
- See the exported .xml file in your downloads folder.
Once you have exported your data from your blog:
- Log in to your ePortfolio site
- Go to Dashboard → Tools → Import
- Install the “WordPress” importer from the list.
- Activate & Run Importer.
- Browse for the file (which will most likely be anXML file)
- Click the “Next” button
- Once you’re done here, you will be taken to a page that will ask you to map authors. If you are importing a blog with numerous contributors, you may want to allow each author to be associated with their respective blog posts. After that, click the “submit” button and the import should begin immediately.
- WordPress will then import each of the posts, pages, comments, categories, etc. contained in this file into your site.
- Check the media library to be sure all of your media assets are migrated.
- You will need to reset some configurations such as selecting a theme and theme options.
One more note of caution: Depending on your blog application, you may not be able to import pages, links, and theme customization. If you need further help with this, please contact us and we’ll get back to you shortly.
What's a feed?
A feed is a way to subscribe to website posts, comments, etc. You can subscribe to a feed use an RSS reader such as Feedly or Digg Reader. To find out more about this RSS thing click here.
How do I find my RSS feed?
In WordPress all RSS feeds are available via URL, you can have feeds for all posts or for specific categories or tags on your site. More info on WordPress feeds here.
http://codex.wordpress.org/WordPress_Feeds#Finding_Your_Feed_URL
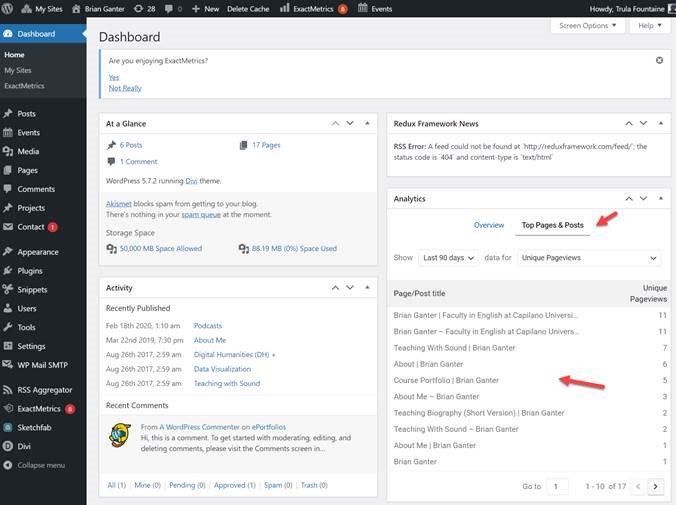
Google Analytics
Google Analytics is set up for the ePortfolio website as a whole. All site administrators will have a Google Analytics module set up on their Dashboard.
On the Dashboard, you will see the full site analytics. If you click on “Top Pages” while on your site Dashboard you will see visits relevant to the site. We just don’t have filters on the main Google Analytics site.
How to delete a browser’s cache and cookies
Browser Cache
Your internet browser’s cache stores certain information (snapshots) of webpages you visit on your computer or mobile device so that they’ll load more quickly upon future visits and while navigating through websites that use the same images on multiple pages so that you do not download the same image multiple times. Occasionally, however your cache can prevent you from seeing updated content, or cause functional problems when stored content conflicts with live content. You can fix many browser problems simply by clearing your cache. This article contains instructions with screenshots on how to clear the cache for all major browsers.
– Multiple Authors. “How to Clear Your Browser’s Cache.” WikiHow. WikiHow, 01 Jan. 2013. Web. 09 Jan. 2015. http://www.wikihow.com/Clear-Your-Browser%27s-Cache.
Learn more on how to clear your browser’s cache (multiple browsers).
Browser Cookies
Cookies contain information that websites have gathered about you and stored on your computer as small text files.
– Multiple Authors. “How to Clear Your Browser’s Cookies.” WikiHow. WikiHow, 01 Jan. 2013. Web. 09 Jan. 2015. http://www.wikihow.com/Clear-Your-Browser%27s-Cookies.
Learn more on how to clear your browse’s cookies (multiple browsers).
FAQs Credits
Credits