by Aurelea Mahood | May 11, 2017 | Blog, News and Updates
This week over at Capilano University, we are wrapping up our Learning and Teaching Symposium, which began on May 8 with a keynote presentation from Dr. Linda Shadiow, author of What Our Stories Teach Us, on “Using Sightlines to Strengthen to the Learning Environment”. Her keynote presentation in combination an afternoon workshop encouraged us as educators to reflect on how our stories as learners in our respective disciplines in turn informs who we are as educators.
This invitation to explore the role of reflection and metacognition in learning was returned to this morning in a series of three linked presentations that I had the pleasure of hosting with my colleagues from the Spring 2017 ePortfolio Development Community.
The opening session – What We Talk About When We Talk About Portfolios – opened with an overview of past portfolio initiatives at the university before moving onto a summary of what was been taking place on campus this past academic, including the English 100 Portfolio Pilot and Liberal Studies Portfolio Project. In particular, this session pivoted on the ideas shared by Cyri Jones (Business), Maureen Bracewell (Anthropology and Women’s and Gender Studies), and Alison Hale (Education and Employment Access) who were invited to reflect on the promise of ePortfolios for students, faculties, and the university as a whole.
Our second session – Folio Thinking / Rethinking Teaching (.pdf) – focused on the process adopted by the Development Community in the redesign process with examples provided by Sheila Ross and Vicky Ross (ENGL 100), Jules Smith (HCA 102), Maureen Bracewell (WGST 222), and Sandra Seekins (AHIS 430).

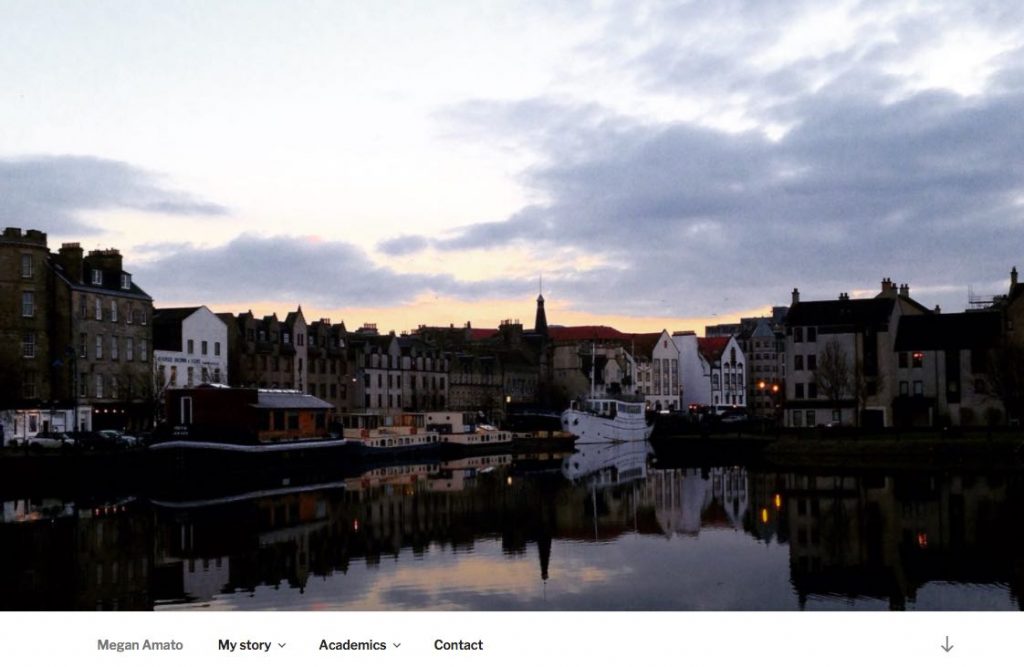
The final presentation – Portfolios in Action (.pdf) – was my favourite of the three sessions. Here we were joined by four students who shared their portfolios with us and provided the room with insights into what they value about course- and program-based invitations to develop professional personal websites. Megan Amato (Liberal Studies), Faith Dawa (Early Childhood Care and Education), Livleen Pannu (Business) and Radovan Marek (Communications) were poised, thoughtful, and inspiring.
Thank you for spending the morning with us.
by | Dec 19, 2016 | Blog, News and Updates
SCHEDULED MAINTENANCE: Due to a planned maintenance, the ePortfolios websites will have intermittent interruptions on Tuesday, December 20 between 9 a.m. and 4 p.m.
Thank you for your understanding as we work to continually improve information technology services at Capilano University.
by Aurelea Mahood | Aug 25, 2016 | Blog, News and Updates
A group of nearly 30 people gathered in the Capilano University Library this morning for a workshop with Tracy Penny Light (TRU) on Portfolios, Pedagogy, and Pathways.
The event was made possible through a grant awarded to the Folio Thinking CLC by the Faculty PD Committee in Spring 2016.
There was fantastic energy in the room and people left ready to explore “folio thinking” in their various home departments. It will be hard to follow Tracy’s advice that we “start small.” In the coming months, we look forward to using this site to share our findings as a campus learning community and build on the theoretical underpinnings and experience-based recommendations shared by Tracy.
by Trula Fountaine | Oct 7, 2015 | Blog, Theme Documentation
Themes
A Theme is the overall design of a site and encompasses color, graphics, and text. A Theme is sometimes called a skin. WordPress site-owners have available a long list of Themes to choose from in deciding what to present to their sites’ viewers.
From the Appearance Themes Screen under the Manage Theme tab you can choose which Theme will be presented to users visiting your site. You can also view screenshots of each Theme you have uploaded to your site. In addition, under the Install Themes tab you can find and install new Themes.
Customize
The Customize Screen displays the settings that can be customized for a specific theme. This option will only be present if the Theme author has configured the theme to allow this capability. For instance, the WordPress Twenty Fifteen theme provides options that allows the user to set the colors and a background image.
The Customize Screen page describes the details of this feature.
by Trula Fountaine | Sep 30, 2015 | Blog, Theme Documentation
Follow the instructions below to configure your Elegant Theme
How to Activate Your Theme
Activate it from within the Appearances > Themes tab.
Adding Thumbnails (aka “featured images”) to Your Posts
For each post, you can define an image that will be displayed along with your content on Posts and Category pages. Thumbnail images (aka Featured Images) are added using the “Featured Image” option within your WordPress Dashboard. Whenever you create or edit a post, look for the “Featured Image” box. This box will be located to the right of your text editor or below your text editor depending on the size of your screen. Click the “Set featured image” link and upload the image that you would like to use. Once uploaded, scroll down and select “Full Size” as your image size, and then click the “Use as featured image” link. This image will now be used as your Thumbnail image for the post.
Important Note: The WordPress thumbnail function re-sizes the image you upload based on what thumbnail sizes are needed for your theme. Each time you change a theme, you may need to re-generate these thumbnails so that they fit your new theme correctly. You can use the Regenerate Thumbnails plugin each time you switch themes to re-generate your thumbnails. After enabling this theme, you should run this plugin to update all of your old thumbnails to avoid design inconsistencies.
Defining a Custom Logo Image
You can define your own logo image from within the ePanel theme options page in your WordPress Dashboard. Within ePanel, under the General Settings > General tab, locate the “Logo” field. In the field, input the full URL to your logo image. You can use the “Upload Image” button below the field to upload your logo image if haven’t already done so. After uploading, copy and paste the URL to the file into the field and click “Save” to save your ePanel settings.
Configuring the Header/Call To Action
The header/call to action to comprised of 4 elements.
Logo Image – Your logo image is defined as outlined above. Once defined, your logo appears first in your header.
Website Description – Your description, displayed below the logo in a red bar, can be adjusted via the “Settings > General” tab in your WordPress Dashboard.
Call To Action Button – Your call to action button can be adjusted within ePanel. Click “Appearances > Theme Options” and locate the “Call To Action Button Url” and “Call To Action Button Text” options listed under the General Settings tab.
Header Background Image – Your header background image can be adjusted via ePanel. Click “Appearances > Theme Options” and locate the “Header Section Custom Background” setting. Click the “Upload Image” button to upload and define a new header image.
Adding Projects
Projects give you a way to showcase your recent work. When a new project is added, it is displayed on the homepage within a grid-based gallery. To add a new project, you can use the “Project” custom post type. After you activate a theme, you will notice a new “Projects” tab has been added. Click Projects > Add New to create a new project. You can add an image to your project using the “Featured Image” link (more info on adding Featured Image above in the “Adding thumbnails (aka “featured images”) to your posts” section).
You can also add galleries to your projects using the standard WordPress Gallery function. To add a gallery to your project, click the “Add Media” icon above the text editor. Next click the “Create a Gallery” link and select the image you would like to add. Once selected, click the “Create A New Gallery” link, followed by the “Insert Gallery” link.
Configuring the Homepage Slider
The featured slider can be set up using two different methods. You can either populate the tabs using Pages, or you can populate it using posts from a designated category. In the Appearances > Theme Options page in wp-admin, under the General Settings > Featured Slider tab, you will see an option that says “Use Pages.” If you select this option then pages will be used, if you don’t then posts will be used. If you want to use Pages then you simply select “Use Pages,” and then below the option select which pages you would like to display in the slider. If you don’t use pages, then simply select the “Featured Category” from the dropdown menu and posts from that category will be added to the slider.
Featured Image
You should also define an image to be used for each page. To add an image to your slider, edit any Post/Page in your slider and add a featured image using the “Featured Image” link to the right of your text editor, or by using the Thumbnail Custom Field as outlined in the “How do I add the thumbnails to my posts? ” section above.
Adding Testimonials
To add a new testimonial, you can use the “Testimonials” custom post type. After you activate Vertex, you will notice a new “Testimonials” tab has been added. Click Testimonials > Add New to create a new testimonial. The body content of your post will be used as the testimonial quote. You can add a photo to your testimonial using the “Featured Image” link (more info on adding Featured Image above in the “Adding thumbnails (aka “featured images”) to your posts” section).
Adding Team Members
You can add members to your team using the “Team Members” custom post type. When you create add a new team member, that person’s bio will be added to your homepage and within the Team Page Template. To add a new team member, click “Team Members > Add New.” The content of your post will appear on the Team page as the member’s bio.
Adding A Photo – Each team member needs a photo. To define a photo for your team member, simply define a “Featured Image” for the post (more info on adding Featured Image above in the “Adding thumbnails (aka “featured images”) to your posts” section).
Adding Skills – Each member bio can include a list of skills. When you create a new Team Member custom post type, you will notice some additional settings below the text editor called “ET Settings.” To add a new skill, click the “Add Skill” button and then fill in the name of the skill and a percentage of expertise. You can also define a “position” for each member, such as “Web Developer” (or whatever position the member fills within your company).
Creating A Team Page – Once you have added some team members, you next need to create a Team page. To do this, simply create a new page and select the “Team” page template from within the “Template” dropdown menu to the right of your text editor within the “Page Attributes” panel. Once published, this page will display a bio of all your team members.
Adjusting Page Descriptions
Below your Page title on each page can be added a unique page description. This description is placed within a colored box just like your website’s description on your homepage. To add a description to a page, you must create a new custom field with the name “Description” (make sure to use a capital D). In the Value field, input the text that you would like to use for your description.
Customizing your theme’s colors using the Theme Customizer
Vertex uses the WordPress Theme Customizer interface to allow you to adjust your theme’s colors quickly and easily. To use the Theme Customizer, click the Appearances > Themes > Customize link. This will launch the customizer along with various color options.
Using Shortcodes – Create advanced layouts with Ease
All of our themes come with a comprehensive collection of shortcodes. These shortcodes allow you to use pre-made design elements to create advanced page/post layouts without any HTML knowledge. When you install the theme, you will notice that some new buttons have been added to the WordPress text editor. Clicking these buttons will reveal options for adding shortcodes to your post.
Using Page Templates to Create Advanced Layouts
All of our themes come with a collection of page templates that can be used for a variety of purposes. You can apply each of these page templates to any page that you have created. When you edit a page in wp-admin, you will notice a Templates dropdown menu to the right of the text editor. Here you can select from a list of available page templates. Once a template is selected, additional settings will appear in the “ET Page Templates Settings” box below the dropdown menu. These settings should be configured to acheive the desired result, as outlined in this video tutorial.
by Aurelea Mahood | Sep 15, 2015 | Blog, News and Updates
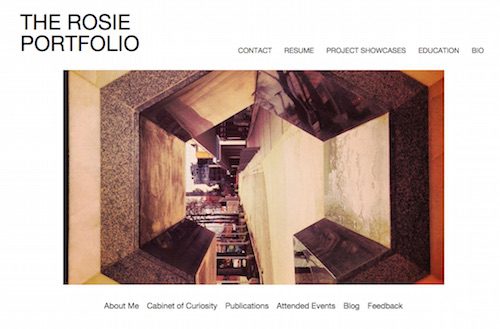
In Spring 2014, Rose Bunagan (LSBA 2014) was one of the peer mentors working on the Capilano University E-Portfolio Project. In addition to building out her portfolio, Rose assisted students from three CapU programs with the development of their digital portfolios.
Since then, Rose has graduated from the Liberal Studies BA and moved on to other adventures, including tackling an MA in Liberal Studies at Simon Fraser University.
Building on the discoveries and recommendations made after the Spring 2014 pilot project, the Liberal Studies BA is excited to be formally launching a Fall 2015 portfolio initiative with all newly admitted Liberal Studies students. We are even more excited to have Rosie back on deck as we introduce the portfolios to the students taking LBST 100 – Approaching Knowledge this term.


 Just because you can, it doesn’t mean you should
 All feedback about your site is an opportunity for improvement